


With the arrival of a new season, I think most beauty & lifestyle bloggers are thinking of how they can update and style up their flat lays.
As I particularly love cosy autumnal images and start to hoard blog props for Autumn, Halloween, Winter and of course Christmas right about now, I thought I'd share some inexpensive items I've picked up recently.
Along with quite a few other blog prop ideas that won't break the bank!

Happy Halloween everyone!
I don't know about you but whether I'm doing anything for Halloween or not I always like to get into the spirit of things and give myself some fun nails and watch a scary movie or two. Halloween nails always get compliments and it personally puts me in a good mood for the occasion.
So I thought I'd round-up 5 of my favourite Halloween/fun nails I've done over the years that you can easily re-create on your own nails or possibly for a child that is going out treat or treating. Hope you like my ideas!

These are a random mix of everything and perfect if you can't decide what to go for. As they are mix and match they kind of look like you have false nails on as well! All you need is a small brush and a dotting tool (you can use the end of a bobby pin if you like) and 5 basic nail polish colours. This is possibly my favourite Halloween nail art to do!
Another very simple nail art look that looks quite creepy as your fingers look like they have eyes! This is simply 3 blobs/circles to create the pupil and then fine red lines to create the outer effect. So easy to achieve!
Black and orange always look great together so here I created a silhouette type scene that's actually pretty simple to do.
These actually look like they are tricky to create but it's simply a line with 2 dots either end to create the bone shade. These couldn't be any simpler and they look great on any dark base nail polish.
Last but not least I thought I'd include some really fun nails that feel quite 'Halloween' to me. It's all about the base here and creating that gradient ombre effect with a small piece of sponge. Then it's applying small wiggly lines over the top for the leopard print.
Hope you've found some spooktacular inspiration here and have a fab Halloween!
Fee xo.
When it comes to seasons I like to fully embrace them... I also love to change up the decor in my home. So it now seems to be a tradition of mine that I have seasonal decorations!
So as I'm feeling very autumnal and tomorrow is Halloween I thought I would share with you my homeware additions, my little doggy and a few other bits & bobs...
Around the fire
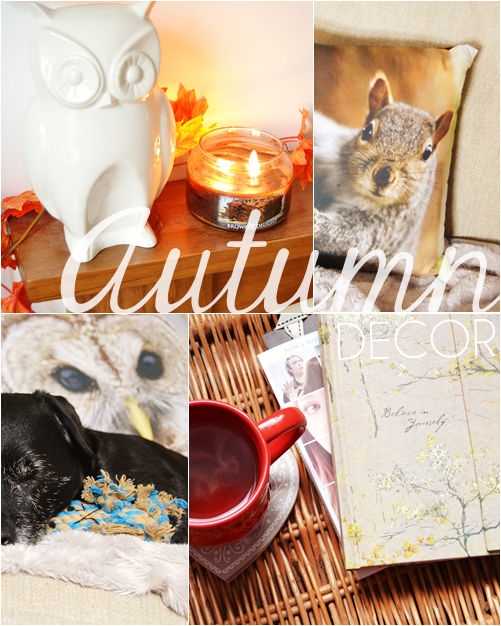
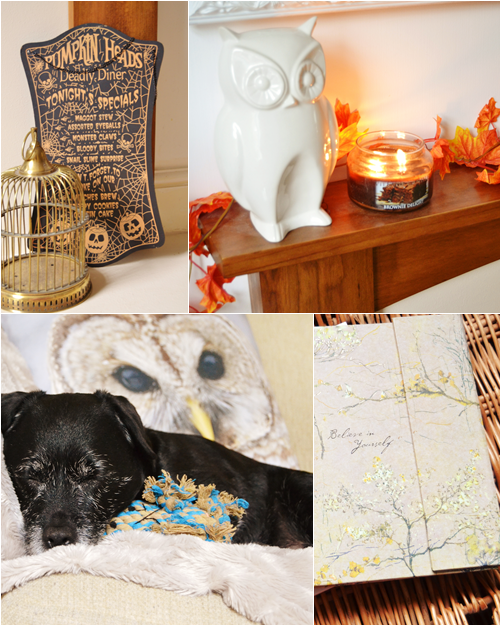
First up is my mantelpiece/fire which I always like to make a feature of even though I don't ever turn the fire on. The main thing here that makes it look cosy and autumnal is my orange maple leaf garland that I purchased from eBay a few years ago (you can find similar cheap ones here). This just brings the outdoors in and the burnt orange shade is spot on. I also like my owls especially the lovely one above, so Oscar Owl (from Homebase last year) takes pride of place on the end of my mantel piece. Next to that I have my wonderful Village Candle in Brownie Delight (£13.24 - eBay here) that I've been continuously burning... I promise it literally smells like you have been baking brownies, I can't even detect a synthetic scent to it!
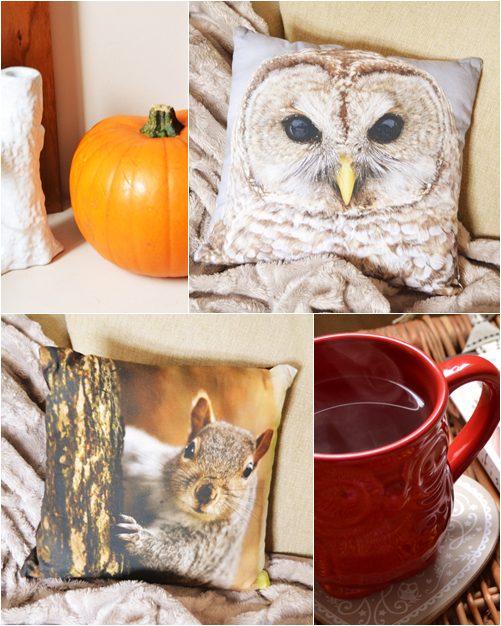
Then to the hearth of my fire I have a little Halloween sign (a bargain at £1 from Poundworld) and a vintage brass birdcage (found at a car boot) to one side then some white log ornaments (from Homesense) and a pumpkin (£1.50 - Asda) I intend to carve, as long as my dog stops scratching at it!
Cosy soft furnishings
As it gets colder cushions and blankets that double up as throws are a must! My two new cushions where a brilliant buy from Asda (£7 each - owl here/squirrel here) which I couldn't be more pleased with - Mr. owl will be staying out till way pass Christmas. On a side note I highly recommend Asda this year for cushions and bedding - great quality, affordable and just spot on for Autumn and Christmas. As for my very cozy and warm throw this was a bit of a splurge from Homesense as it was around £25, but I figure if it will keep me from turning on the heating as much then it's paid for itself, right?
Little extras
Next to the armchair in my living room I have a simple brown wicker picnic basket that I use as kind of an informal side table. This always has a stack of books on it and a special Believe in Yourself Notebook (£8.49 - Amazon here) which is where I plan all my blog posts. Every other page has a little encouraging quote to it and it's just beautiful. Next to that tends to be a drink of some kind if I'm blogging away... at the moment I love Whittard's Turkish Apple Instant Tea (£5.50 here) during the day - which is in an red owl mug... I told you I liked my owls! Sadly I don't know where it's from as it was a gift last Christmas. Then the little coaster underneath, again featuring owls, were a savvy buy from B&M Bargains at 99p for a set of two.
Hope you've enjoy this slightly different type of post today and I've maybe inspired you to add a few autumnal editions to your home or bedroom!
Fee xo.

As Halloween is just around the corner I thought I'd sit down and create some quick Halloween nails.
I literally grabbed the nail polishes I needed and the Avon Nail Decoration Tool which is a dotting tool and nail art brush in one and gave myself this mismatch Halloween manicure in under 10 minutes. My favouritee design has to be the dripping blood nail art but I really think the mix and match look really works - really vibrant and fun!
Here is how I created each nail...

1. Brain Nails - This is basically a more messy leopard print design using a dotting tool. Just longer splodges and closer together. I did this really quick but you could use a smaller dotting tool and make the design more detailed. (Polishes Used: Avon Reddy To Go and Avon French Manicure White)
2. Tiny Spiders Nails - To create this nail I added a few dots and then added the legs with the nail art brush. Very simple to do. (Polishes Used: NYC Spring Street and Avon Rapid Black)
3. Dripping Blood Nails - I wonder how easy it was to create dripping tip nails but discovered it was so simple. Just add 3 or 4 dots near to the tip of the nail with a dotting tool and then fill in with more nail polish on the dotting tool. (Polishes Used: Avon French Manicure White and Ciate Mistress)
4. Frankenstein Nails - This was simply done with a nail art brush, pretty self explanatory. To make this even easier you could even use a fine liquid eyeliner pen... but remember to add a clear top coat so it doesn't wash off! (Polishes Used: Sally Hansen Grass Slipper and Avon Rapid Black)
Hopefully this has given you a few ideas to sport some fun Halloween nails this week!
Fee xo.
Hopefully this has given you a few ideas to sport some fun Halloween nails this week!
Fee xo.

As it's Halloween weekend I thought I would do a fun and easy Halloween idea!
I love Munchkin Pumpkins - they are cute and super easy to carve/scoop out... no masses of stinky pumpkins to get rid of. Also this little man only costs £1-2 to create.
This is a really good project for children to do (minus the cutting) but actually I really enjoyed creating this myself and going a bit crazy with the glitter. The outcome is a cute little pumpkin or family of pumpkins to place as a Halloween display or on your mantel piece.

You will need - A munchkin pumpkin (found in most supermarkets in October - £1), Whole Cloves, A pen, Plastic vampire fangs (10p), A sharp kitchen knife/craft knife, Nail Polish or Paint, Glitter to decorate.
1. First mark out the size of the mouth opening by placing the plastic teeth where they will be going on. Then draw around the teeth or mark either side. Also mark out where the eyes will be going.
2. Next pierce the hole for the eyes and cut out the mouth hole. The pumpkin will be quite tough so be careful when carving the pumpkin. Also make sure the teeth fit the hole.
3. Remove all the pumpkin seeds and nasty stuff with your fingers or the end of a spoon. You want to make sure you have it all out or it will smell!
4. Next it's painting and decorating time! I used nail polish as I didn't have any paint to hand but paint would be a lot quicker. I also painted the stark with gold glitter nail polish and dusted the top with glitter.
5. Once dry (you can speed up drying time by using a hair dryer on it) you can then put in your plastic teeth and cloves!
Here are a few more ideas that you can do with large pumpkins or munchkin pumpkins...

My favourites have to be...
Melted Crayon Pumpkins (1)
So easy and cheap to do! So many ideas can be found online for this.
Celestial Pumpkins (3)
Amazing for large pumpkins! I would have never thought to use battery operated fairy lights inside a pumpkin or drilling holes it in either.
Gold Thumbtack Covered Pumpkins (9)
This is an amazing idea... they just look so good. This also saves on having to scoop out the pumpkin.
Hope you like my little DIY Halloween post!
I'm off to give myself a Halloween manicure now whilst watching Casper. Hope you all have a lovely Sunday.
Fee xo.

Halloween is still quite a while away but as I like to get in to the spirit of holidays I thought I'd post the nails I'm sporting this weekend. Though expect fun Halloween nail art posts nearer the end of the month!
These nails were inspired by the Maybelline Colour Shot Polka Dots Nail Polish in Dotty which sadly isn't available to the U.K (see swatches here) but is the most perfect polish for Halloween. So I thought I'd try to recreate it with the amazing L'Oreal Confetti Top Coat over an orange base.
To start off my Halloween-esqe nails/ Maybelline Dotty dupe I decided to go for Essie Orange, It's Obvious (£3.99 - Xtras here) which is actually a really versatile orange. This bold organge shade is great to wear in summer on the fingers and toes as well as in autumn and of course for Halloween.

I then applied a single coat of the all important L'Oreal Confetti Top Coat (£4.99 - Boots here) that gives that speckled Halloween look to the nails without being too much. This applies so easily and dries pretty fast. I then added my favourite NYC Top Coat (£1.79 - Superdrug) to give a glossy finish.
If you find nail art difficult or just too time consuming these nails are great as they are clearly Halloween themed and almost look like some sort of candy on the nails!
You can find 5 more ideas of how to use the L'Oreal Confetti Top Coat in my post here.
Hope you all have a good weekend!
Fee xo.

From a Christmas post to a Halloween post in one day! I keep actually forgetting that it hasn't been Halloween yet, as it is mid-week this year.
But even if you celebrated Halloween over the weekend these are nails you can do super fast and people will really notice them!
When it comes to nail art I always think simple is best. You don't want something too complicated that you can't recreate on your other hand or that takes you an hour to do. So anything that includes lines, dots and swirling colours together is for me - though I do like trying out different things to see how it looks.

What you will need...
For this you will need a thin nail art brush and a dotting tool... however if you haven't got either of those you can use a fine paintbrush or eyeliner brush and for the dotting tool an open out hair slide/bobby pin will work perfectly.
Though if you know you want to try out more nail art then getting a set of nail brushes and different sized dotting tools is so inexpensive! The brush I used here is from a 6 piece nail art brush set which is only £2.79 free p&p from a UK seller on eBay (listing here) and the dotting tool see here is from a set of 5 2-way dotting tools which are an amazing £1.58 free p&p from a UK seller on eBay (listing here). So for under £5 you can try out all different types of nail art.
How to achieve Bone Nails...
I won't even explain how to do the little stitches on the green nails as it's so easy to do. But I discovered a fool-proof way of creating little bones on the nails - so easy!
You basically want to paint small lines onto the nails at different angles, I would say a maximum of 4 lines per nail. Then with your dotting tool you want to place 2 dots next to each other either end of each line. You want to overlap the dots a little so they don't look like two dots. Then you are done! So simple.
Super duper easy and quick to do.
Oh, I forgot to mention the Models Own polish is Toxic Apple - I had to get it for Halloween!
Fee xo.

Carrying on with all Halloween things today I thought I would share with you what I am calling my witch-y bath!
When I was totally SLS-free Lush Bath Bombs were something I knew I could treat myself to that were fun and didn't of course contain SLS.
The Enchanter Bath Ballistic (£3.20 - here) is a limited edition Halloween product that casts a magical spell over your bath. I dropped this large bath bomb in my filled bath and watched it spin and fizz colours of yellow, then orange and then finally pink - pretty amazing to watch!
Once you get into your magical bath the different colours/fizz do seem to somewhat disappear but the bath water does stay bright orange. Like bathing in Irn Bru! I'm sure this is something kids would love!

The scent of the Enchanter Ballistic is definitely my favourite part of this bath bomb. The Frankincense and zingy orange scent really does fill the room and is quite relaxing. The scent is the exact same as last years Halloween ballistic - Skullduggery.
But... there is a but! The different colours in this bath bomb are pretty amazing however the pink dye stains! It stains the skin whilst in the bath and it also stains the bath... which for me makes no sense at all! You have a bath to relax and to get clean, not get dirty and have to start cleaning after your bath. So whilst having a bath and noticing I had pink marks on my arms and legs I grabbed my exfoliating gloves and removed them whilst in the bath, then cleaned the marks around the bath as I let the water out. Not too much hassle but not what I was expecting and I'm thinking if you didn't have anything scrubby to hand then you would have to have a shower to remove the pink marks from your skin and clean the bath afterwards - quite annoying.
So really I am in two minds about this bath bomb. I loved the smell and how it transformed my bath but the pink dye really was too much!
As a one off this is a fun treat or if you have children then they are sure to think this is the best thing ever!
Fee xo.

It's Halloween! Okay, it's not Halloween just yet, but seeing as it is mid-week this year I'm sure most Halloween-y things will be going on at the weekend.
My weekend will consist of watching Hocus Pocus, as it's one of the best non-scary Halloween films. I love the scene with the water sprinkler and the 'black river' you can watch the clip here on Youtube. Also I always forget that Sarah Jessica Parker is in it because it just doesn't look like her.
I'm also tempted to buy some pumpkins for my nieces over the weekend, to carve and decorate... something that will be very messy I'm sure!
Have you got anything planned for the Halloween weekend?
Fee xo.

Not my best nails but I promised Halloween related things and Halloween nail art is fun to do!
If only I could have got my tree silhouette right then it would have looked really good I think. But sadly one looks like a palm tree and the other looks like a Texas cactus scene! I think the problem was I used the wrong nail art brush and it just wouldn't do as it was told and it was also too thick. I won't even go into how i did the nails as it's simple enough, though I will say it's much easier if you paint the tips of the nails black with the nail polish brush first - think a wonky french manicure.
The nail polishes used were - Rimmel Black Cab (best opaque black I use), Essie Orange, Its Obvious (£2.99 - Xtras *featuring new brush*) and NYC In A New York Minute Top Coat (favourite high-street to coat).
Fail nails, but from afar they do look good enough.
Next week I have an Eyeball nail art tutorial coming up and also a tutorial for brains nail art !
Fee xo.

It is nearly Halloween! So I have some spooky specials coming up in the form of product reviews and nail art.
Over the past few years I have actually got quite in to celebrating Halloween; dressing up, going to Halloween parties and last year I carved my own Pumpkin and discovered how disgusting the inside of a pumpkin actually is - ergh.
But whether you stay in (and ignore the treat-or-treaters mwahaha) or go out, it is really fun to try some Halloween treats - in the form of Lush Halloween products... and also sweets, my favourites have to be Haribo!
The three limited edition Halloween products from Lush are - Twilight Shower Gel (£4.25/100g - here), Calagas Shower Jelly (£3.25 - here) and The Enchanter Bath Bomb (£3.20 each - here).
The shower jelly is just great! It smells of lime and sweets and is such a fun product... did you spot the scary face in the jelly? But I cannot wait to try out The Enchanter bath bomb as it has a lovely zingy citrus scent to it and is supposed to change colour as it fizzes away in the bath.
Do you celebrate Halloween in any way?
I am being the Queen of Hearts this year from Alice In Wonderland!
Fee xo.
Subscribe to:
Posts (Atom)